2D platformer physics
7 Nov 2017Creating a platformer
The platformer is one of the most classic genres in gaming. From super mario bros. to the most popular games today, platforming mechanics don't go out of style. In this tutorial, I will walk through the process of creating a 2D platformer in javascript. The implementation in split up in two parts:
- The platformer engine, which is independent from the game itself, it can be reused anywhere
- The game, which tells the platformer engine what the shape of the level is, where to spawn the player and how to move the player
The end result is a solid understanding of platformer physics and a simple to use platformer engine to use as a template for 2D platformers. I use javascript in this article to be able to provide an interactive example, but the code could easily be ported to your favourite language in 15 minutes or so. The resulting engine and example game can be found in this repository, and the game can be played at the end of this article.
Requirements
Building a system from the ground up gives you the luxury of setting your own requirements. Personally, I've built this system to serve as a very general template for platformers. I may use it at a game jam for example, where quick deployment is vital. Therefore, I need it to be as generic as possible. I define my requirements as follows:
- The system must be self contained, so no external dependencies or references
- It must be as unrestrictive as possible, so no predefined constants
- It shouldn't handle graphics, this is out of scope
- It shouldn't be grid based but edge based
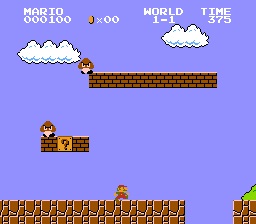
The last point requires some explanation. Most platformers, especially the classics, were grid based. The world was a grid, and cells were either air or solid (unpassable). The world is built with blocks. Figure 1 shows a well known example of such a system. While this works, I want my system to be as generic as possible as per point 2 on the list of requirements. I therefore make the system edge based. Not entire cells are impassable, but edges of these cells. If I'd like to make a cell based world, I can just make the edges around the cells solid. If I want to make levels more compact, I can define walls and ceilings by edges instead of entire grid cells.
The system
Now that the requirements are clearly defined, a suitable system can be designed to fulfill these requirements. I chose three classes to represent the environment:
- A grid, which contains solid edges dynamic objects should collide with
- A moveable grid node representing a player or enemy, which can be added to a grid
- A grid cell, which can have a ceiling and / or a wall
The grid
Using this division of responsibilities, only the grid class needs updating. When it does, it iterates over all added nodes and moves them over the grid. The grid's main property is its resolution which determines the length and height of the edges. The grid then contains cells, which I define in this very simple class:
function PlatformerGridCell() {
  this.wall = false;
  this.ceiling = false;
}
A grid cell can have a ceiling and / or a wall. If wall = true, it means the left edge of the cell is impassable. If ceiling = true, it means the top edge of the cell is impassable. The grid is initially filled with empty cells, which are stored in a one dimensional array.
Besides a resolution and size, the grid requires some properties influencing node behavior. It requires a gravity constant, determining how fast the nodes will accelerate downwards. Friction is also defined, which decelerates nodes while they move over a horizontal surface. I chose some defaults that could (and should) be overridden by the user. The constructor is shown below.
function PlatformerGrid(width, height, resolution, gravity = 2500, friction = 1700) {
  this.width = width + 1;
  this.height = height + 1;
  this.resolution = resolution;
  this.gravity = gravity;
  this.friction = friction;
  this.cells = [];
  this.nodes = [];

  for(var i = 0; i < this.width * this.height; ++i)
this.cells.push(new PlatformerGridCell());
}
Note that the width and height properties are incremented by one. This is done because cells can only define their left and top edges; a 2x2 grid wouldn't be able to define a 2x2 box because there wouldn't be enough cells to close the box on the right and bottom side, so I pad the grid with an extra row and an extra column.
The node
Nodes are the moving parts on a grid. These can be players, enemies or debris for that matter; it's anything that moves and collides. All nodes have a rectangular hit box with which they interact with the environment. They also have an x and y position, and x and y velocity. Note that I keep horizontal and vertical velocity separated instead of defining and using it as one vector, this keeps movement and collision handling simpler. To get a node moving, the user only needs to change the speed variables. Finally, each node has a boolean onGround indicating whether the node is resting on a horizontal surface. This is a very useful variable, because certain actions should only be possible when a node is resting on the ground (like jumping) or when it is flying (like double jumping). The constructor for a node is given below:
function PlatformerNode(x, y, width, height) {
  this.x = x;
  this.y = y;
  this.vx = 0;
  this.vy = 0;
  this.width = width;
  this.height = height;
  this.onGround = false;
}
Getting things moving
All properties required for a basic platformer are now defined, so it's time to write an update function for the grid class which will get all nodes moving. Movement speed is governed by a timeStep variable, which is the time in seconds the current update iteration takes. This variable comes from an external game loop. I will not go into further detail about game loops here, but the code for the example game is given at the end of this article. The source code for the entire algorithm is given at the end of this section.
The grid has an upate function, which iterates over all nodes and updates them. Updating a node consists of the following steps:
- If horizontal speed is not zero:
- Store the nodes previous x position
- Move
xbyvx * timeStep - If
vx > 0- If right edge moves over grid edge
- Check if right edge crossed any solid edge
- If solid edge was crossed, move node to the left until it stands against the border it crossed, set
vxto zero
- else
- If left edge moves over grid edge
- Check if left edge crossed any solid edge
- If solid edge was crossed, move node to the right until it stands against the border it crossed, set
vxto zero - If
onGround = true - If there are no solid cells under this node,
onGround = false - If
onGround = true - Apply horizontal friction
- If
onGround = false - Add gravity to vertical speed
- If vertical speed is not zero
- Store the previous y position
- Move
ybyvy * timeStep - if
vy > 0- If bottom edge moves over grid edge
- Check if bottom edge crossed any solid edge
- If solid edge was crossed, move node up until it stands against the border it crossed, set
vyto zero
- else
- If top edge moves over grid edge
- Check if top edge crossed any solid edge
- If solid edge was crossed, move node down until it stands against the border it crossed, set
vyto zero
The three big steps in the algorithm are straightforward. Move horizontally first, then check if you're still on solid ground (start falling otherwise), then handle vertical movement. Movement is only handled when speed is nonzero. This makes the algorithm more efficient, having many (mostly) idle nodes will not give a significant performance hit.
Collision checks for both horizontal and vertical collisions are also used sparsely. For example, if a node is moving to the right, the algorithm only performs checks when the right edge of the node crossed a grid line. This makes sense, because only grid lines can contain solid edges. This is also the reason why the loop stores the nodes previous x and y positions; it can then check whether the new x or y position falls in a new grid cell.
When it comes to a collision check, the node dimensions are taken into account. I added the functions getXCells() and getYCells() to node, which returns the entire range of cells a node can possibly collide with for that dimension. Because of this system, weirdly shaped nodes are possible. I also added a bunch of helper functions to node. These functions are used to set horizontal or vertical speed, and to find the coordinate of the cell north, east, west or south of the node.
Node speed is limited depending on the grid resolution. If a node would move faster than the grid resolution for a frame, it may skip an entire cell. It could be that this cell contains a solid wall, which should not have been passed. Limiting movement per frame to the grid resolution solves this problem, but then I assume this speed probably won't be reached in my game. If this assumption doesn't hold, I would need to expand the collision algorithm a bit and check collisions for all cells passed between the previous frame and the current one. This is called continuous collision detection, and it can be quite an issue in many big game engines.
The source code for the finished platformer engine can be found here.
Note that I sometimes use the constant EPSILON, which is defined as an arbitrary small number. This constant plays a vital role. When colliding with a wall on the right for example, the node's x position is set to the wall's x position minus node width. However, the right edge of the node is still in the cell left of the edge it collided with (at least is should be). To find the cell the right edge is in, I use Math.floor((x + this.width - PlatformerGrid.prototype.EPSILON) / resolution). Without EPSILON, the cell right of the current cell would be returned. EPSILON can be seen as a way of giving nodes a small inset, making their hitbox a tiny bit smaller than their actual size.
A simple game
With the finished platformer classes, a small game can be made to demonstrate and test it. I will not go into much detail about the example game I've made because that's outside the scope of this article, but the code can be found here.
The example game is pretty simple. It creates a grid the size of the canvas, and adds a node representing the player to this grid. The node responds to the A, W and D keys to walk and jump. Initially, a floor is created by setting all bottom cell ceilings to true. The level can be expanded by clicking on grid edges. The game can be played below:
Note that the platformer engine knows no concept of jumping, walking or running. This is all up to the user by altering horizontal and vertical speeds in a certain way. The source code for both the platformer engine and this example game can be found in this repository.
Conclusion
We now have boilerplate code for any 2D platformer. The physics engine itself could be extended in a number of ways:
- Add a friction and mass factor for nodes, so that some nodes have more or less friction and gravity than others
- Add callback functions to node, which will trigger when the node hits a wall or lands on the ground
- Support moving platforms by making every moving platform another grid, where new nodes will be transfered to when they land on them
- Implement collision events between nodes
- One way edges, for example a platform acting as a floor but not as a ceiling
- Implement slopes
The next step in building a game would be implementing core mechanics and graphics. A level editor should be created (or an existing one could be used) to fill the grid, probably by storing the cells as json data or some other suitable format. Because the physics engine has no dependencies on the game, any graphics system can be used.
Appendix: jump height
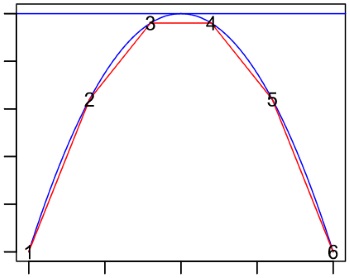
In this tutorial, I picked some arbitrary jump speed which turns out to jump a little over two grid cells high. When designing a game, knowing movement limits is essential. You'll want to know how wide a passable ravine can be, and what the height limit of a reachable ledge is. When a game runs on variable time step like this one, it's not always simple. Figure 2 shows a problem: the blue curve is the theoretical jump curve, which hits the blue line. This is the theoretical maximum jump height. The red curve however shows the actual path a player traverses when a jump takes six frames. This path never reaches the theoretical jump height. The fewer frames your system produces, the further a player may end up below the blue line. If your end user plays the game on a slow system, fewer frames will be produced.
A solution is to pick a good margin by which to overshoot the blue line. If I want the jump height to be 64 pixels for example, I would like the blue line to be at 80 pixels. This ensures that the height of 64 pixels is always reached regardless of frame rate (for any expectable frame rate). Instead of picking arbitrary values for gravity and jump speed, we should calculate them to have the properties we want. We need to get control over the following constants:
- Maximum jump height
- Jump time
I call maximum jump height $\alpha$ and jump time $t$. I want to compute a gravity constant $\gamma$ and a jump speed $j$, which is the speed the player gets when the jump button is pressed. The following formulas obtain $\gamma$ and $j$ from $\alpha$ and $t$:
$$\gamma = \frac{2 \alpha}{t^2}$$
$$j = - \sqrt{2 \alpha \gamma}$$
With these formulas, we can choose a desired jump time and height and calculate our constants from that. If I would make a game where the grid resolution is 32 and the player should be able to jump two cells high but no higher, I would set $\alpha$ to $80$ ($2.5 * 32$). The player will now jump over two cells high with a safe margin of $50\%$. The value of $t$ is a matter of feel; fast paced games will keep this value rather low, while a jump in a low gravity environment should take a while.