Convolutional textures
7 Jan 2019Self-updating textures
When simulations or rendering tasks can be parallellized, it is usually a good idea to perform them on the GPU. In this article, I will explain a technique using this fact to achieve impressive visual tricks at a low performance cost. All effects I'm about to demonstrate are achieved through textures that "render to themselves" when they are updated; the texture is updated whenever a new frame is rendered, and the next state of the texture depends completely on the previous state. Certain shapes can be painted onto these textures at any time to trigger certain changes, and the texture can be used directly or indirectly to render interesting animations. I call them Convolutional textures.
Before continuing, there is already a problem that needs to be addressed: a texture cannot be read from and written to at the same time, graphics API's like OpenGL and DirectX don't allow this. Because the next state of a texture depends on the previous state, a workaround is needed. I need to read from a different texture than the one I'm writing to.
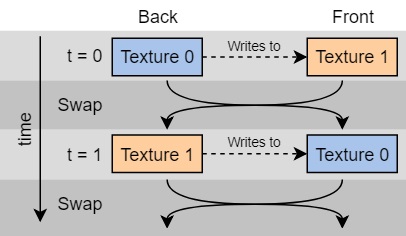
Double buffering provides a solution. Figure 1 shows how this works: there are actually two textures instead of one, but one of them is being written to while the other one is being read. The texture being written to is known as the back buffer, and the one being rendered is the front buffer. Because a convolutional texture "writes to itself", the back buffer writes to the front buffer on every frame, and then the front buffer is rendered or used for rendering. When the next frame arrives, the roles are swapped and the previous front buffer is used as a source for the next front buffer.
A convolutional texture achieves interesting effects and animations by using a specific fragment shader (or pixel shader) to render the previous state to the next one. The shader determines how the state changes. The source code of all examples in this article (and more) can be found in this repository on GitHub.
Simple applications
To demonstrate this technique, I've chosen a well known simulation where the state depends completely on the previous state when updating: Conway's game of life. This simulation takes place on a square grid, and every cell is either alive or dead. The rules for the next state of a cell are simple:
- If a living cell has less than two neighbors, it becomes a dead cell.
- If a living cell has two or three living neighbors, it remains alive.
- If a living cell has more than three living neighbors, it becomes a dead cell.
- If a dead cell has three living neighbors, it becomes a living cell.
To implement this game as a convolutional texture, I interpret the texture as the game's grid, and the shader renders using the rules above. A transparent pixel is a dead cell, and a white opaque pixel is a living cell. This interactive implementation is shown below. To get access to the GPU, I'm using myr.js, which requires WebGL 2. Most modern browsers (E.G. Chrome and Firefox) can run this, but if it doesn't work, your browser most likely doesn't support it yet. Use the mouse (or a touchscreen) to paint living cells on the texture.
The fragment shader code (in GLSL, since I'm using WebGL for rendering) is shown below. I first implement the function get, which helps me to read a pixel with a certain offset from the current one. The variable pixelSize is a predefined 2D vector containing the uv offset per pixel, and the get function uses this to read a neighboring cell. The main function then determines the new color of a cell depending on the current state (live) and the number of living neighbors.
uniform sampler2D source;
uniform lowp vec2 pixelSize;

in mediump vec2 uv;

layout (location = 0) out lowp vec4 color;

int get(int dx, int dy) {
return int(texture(source, uv + pixelSize * vec2(dx, dy)).r);
}

void main() {
int live = get(0, 0);
int neighbors =
get(-1, -1) +
get(0, -1) +
get(1, -1) +
get(-1, 0) +
get(1, 0) +
get(-1, 1) +
get(0, 1) +
get(1, 1);
if (live == 1 && neighbors < 2)
color = vec4(0);
else if (live == 1 && (neighbors == 2 || neighbors == 3))
color = vec4(1);
else if (live == 1 && neighbors == 3)
color = vec4(0);
else if (live == 0 && neighbors == 3)
color = vec4(1);
else
color = vec4(0);
}
Another simple convolutional texture is the falling sand game, where the user can throw colored sand into the scene that will fall and form heaps. Although the implementation is a bit more complex, the rules are simpler:
- If there is no sand below a grain of sand, fall one pixel down.
- If there is sand below a grain of sand, but it can slide down 45 degrees either to the left or to the right, it will do so.
The controls for this example are the same as they were in the game of life above. Because the sand can only fall with a speed of one pixel per frame using these rules, the texture updates three times frame to speed it up a little. The source code for this application can be found here.
A step further
| Channel | Usage |
| Red | Wave height |
| Green | Wave speed |
| Blue | Unused |
| Alpha | Unused |
The examples above use the convolutional texture directly; their contents are rendered to the screen as they are. The use cases are quite limited when we soley interpret the pixels as an image, but thanks to modern hardware we don't have to. Instead of interpreting the pixels as colors, I will interpret them as something different which I can use to animate another texture or a 3D model.
First, I will interpret a convolutional texture as a heightmap. The texture will simulate waves and ripples on a plane of water, and the results will be used to render refractions and shaded waves. Now that I don't read the texture as an image anymore, I can use its pixels to store whatever I like. For the water shader, I will store the wave height in the red channel and the wave momentum in the green channel, as shown in figure 2. The blue and alpha channels will remain unused for now. Waves are created by painting red blobs on the convolutional texture.
I won't go into the method that updates the heightmap, but I borrowed it from the website of Hugo Elias, which seems to have disappeared from the internet. He too knew this algorithm from an untraceable author, and implemented it on the CPU in C. The source code for the application below can be found here.
I have only used the height map for displacing a texture and adding some shading here, but much more interesting applications exist in the third dimension. When the convolutional texture is interpreted by the vertex shader, a flat subdivided plane can be displaced to render three dimensional waves. The usual shading and lighting can be applied on the resulting shape.
It's worth noting that the pixels in the convolutional texture above sometimes store very small subtle values that shouldn't disappear in rounding errors. Therefore, the color channels on this texture need a higher resolution than the default of 8 bits. I have increased it to 16 bits per color channel for this example, which turns out to be precise enough. When storing something else than pixels, increasing texture precision is often required. Luckily, modern graphics API's support this.
Using all channels
| Channel | Usage |
| Red | X displacement |
| Green | Y displacement |
| Blue | X speed |
| Alpha | Y speed |
The water example only uses the red and green channels, but the next example will use all four. A field of grass (or trees if you will, it looks rather abstract) is simulated, which can be displaced by moving the cursor through it. Figure 3 shows how data is stored in a pixel. The red and green channels store displacement, while the blue and alpha channels contain speed. This speed will be updated to move the displacement towards the resting position after waving around for a while.
In the water example, creating waves was rather easy: blobs could be painted onto the texture, and alpha blending ensured soft shapes. Multiple overlapping blobs created no problems. It will be trickier here, since the alpha channel is in use. Painting a blob with an alpha value of 1 in the center and 0 on its edge won't work because it would add an unintended momentum to the grass (since the alpha channel is used to store the vertical momentum). In this case, a separate shader has been written to paint influences onto the convolutional texture. This shader makes sure alpha blending does not result in unintended effects.
The source code for this application can be found here.
The grass I've created here is 2D, but the effect would work well in 3D environments. Instead of displacing pixels, the vertices can be displaced, which is faster as well. Another effect that could be achieved using vertices is different branch strengths: grass would bend easily with the wind, while strong trees only budge during storms.
While there are many algorithms and shaders that create wind and displacement effects on vegetation, this approach has one major advantage: painting influences onto the convolutional texture is very cheap. If this would be applied in a game, hundreds of influences can determine how vegetation moves. Not just the main character but all objects, animals and movements can influence the world at a low performance cost.
Other uses & caveats
Many other applications can be imagined, for example:
- Wind speed can be simulated as a convolutional texture. Obstacles can be painted onto the texture, which will cause the air to flow around them. Particles (like rain, snow and leaves) can then use this texture to flow around obstacles.
- The way smoke or fire propagates can be simulated.
- The thickness of a layer of snow or sand in a scene can be encoded on a texture. Footsteps and other interactions with the layer can then make dents and prints in the layer.
There are also some challenges and limitations when using this method:
- It is hard to adjust the animations to variable framerates. In the falling sand example, grains fall at a fixed rate of one pixel per update. A possible solution for this would be to update convoluational textures with a constant rate, similar to the way most physics engines are used; the physics engine runs at a fixed rate and its results are interpolated.
- Sending data to the GPU is fast and easy, getting anything back is not. This means that most effects created with this technique are one direction only; they are sent to the GPU, and the GPU does its thing without further interference or feedback. If i'd want to incorporate the wave height from the water example into my physics calculations (for example if ships must float on the waves), I will need the values from the convolutional texture. Getting texture data back from the GPU is terribly slow and should not be done in real time. A solution for this issue would be running two simulations: a high resolution one for the water graphics as a convolutional texture, and a very low resolution one on the CPU for the water physics. If the algorithms are equal, the discrepancies might be acceptable.
The demonstrations in this article could be optimized further. The grass example can use a much lower resolution convolutional texture without noticeable effects; this helps a lot in large scenes. Another optimization could be using a lower update frequency, for example every four frames, or a quarter per frame (since this method has no problems with segmenting updates). To maintain a smooth framerate, the previous and current state of the convolutional texture can be interpolated.
Because convolutional textures use double buffering internally, one could use both textures simultaneously for rendering. The front buffer is the current state, and the back buffer the previous state. This can be useful for interpolating the texture over time, or to calculate derivatives of values on the texture.
Conclusion
Especially in 2D software, the GPU sits idle most if not all of the time. Although it may not seem like the GPU can play a role when no complex 3D scenes need to be rendered, the technique I have discussed in this article shows at least one way to unleash its power in different ways. By leveraging the capabilities GPU's were designed for, interesting effects and animations can be created that are usually too intensive for the CPU to calculate.